1. 1장 Review, 2장 컨테이너설치(Tomcat 서버)->무료, JRun->유료, 3장 JSP문법->과제=>서블릿
c:\webtest
|
-web
|
-client
|
-jsp
==============
● JSP
▶ 톰캣설치
=>Tomcat->http://tomcat.apache.org/
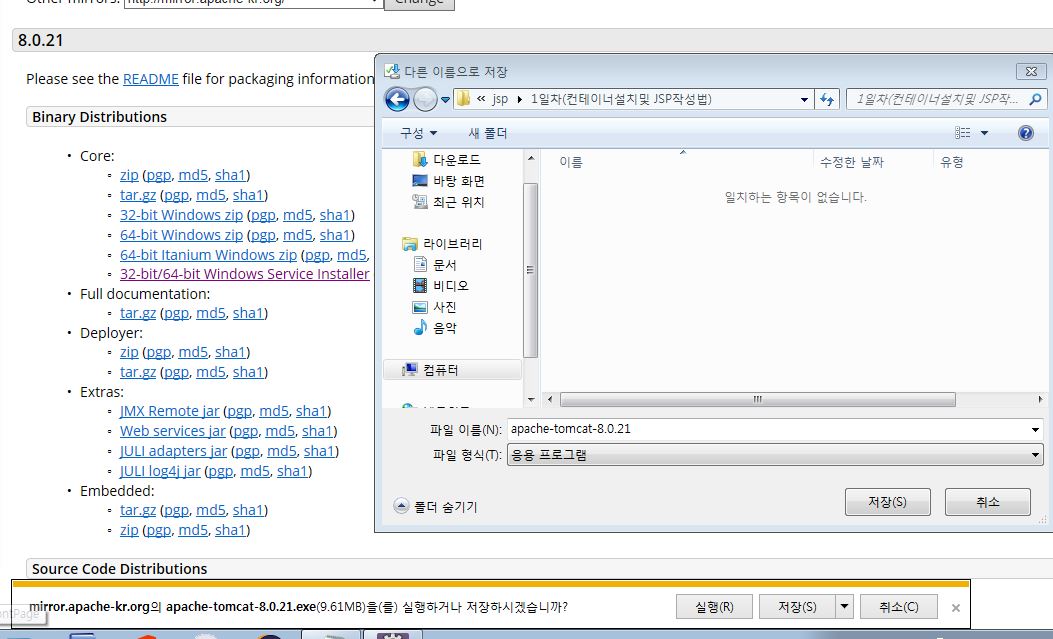
프로그램 설치-> 가장 최신버전의 바로 밑의 버전(7.0)==>Tomcat 8.0(설치의무화)
※ version 8.0.21
1. 32-bit Windows zip (pgp, md5, sha1)
~.zip=>설치과정이 필요없다
=> 압축풀면 끝->나중에 환경설정이 필요
2. 설치과정이 있는것이 좋다.
★32-bit/64-bit Windows Service Installer (pgp, md5, sha1)★
–> apache-tomcat-8.0.21.exe
(1)톰캣 설치과정
설치->환영메세지->동의=>컴포넌트 선택(샘플링 예제도 같이 설치체크(Examples))

(2)HTTP/1.1 Connetor Port
8080=> 오라클 설치->8080포트사용==>8090=>오라클과 충돌나지 않게 하기위해서 포트변경
Tomcat의 관리자 모드로 로그인
관리자이름, 암호 부여?->admin, 1234

(3)C:\Program Files\Java\jre1.8.0_31
->톰캣서버에서 자바의 실행에 관련된 파일의 경로를 찾아준다.
=>못찾으면 자바를 지우고 다시 설치한후 톰캣서버를 설치할것
(4)설치경로
C:\Program Files\Apache Software Foundation\Tomcat 8.0
->C:\Tomcat 8.0=>경로를 짧게 설정할것

↓ 체크해제
C:\Tomcat8.0\bin
Tomcat8.exe->콘솔모드로 서비스가동(권장)
=>바로가기 아이콘으로 내보내기
Tomcat8.0_run.jpg
Tomcat8w.exe->대화상자로 서비스 가동
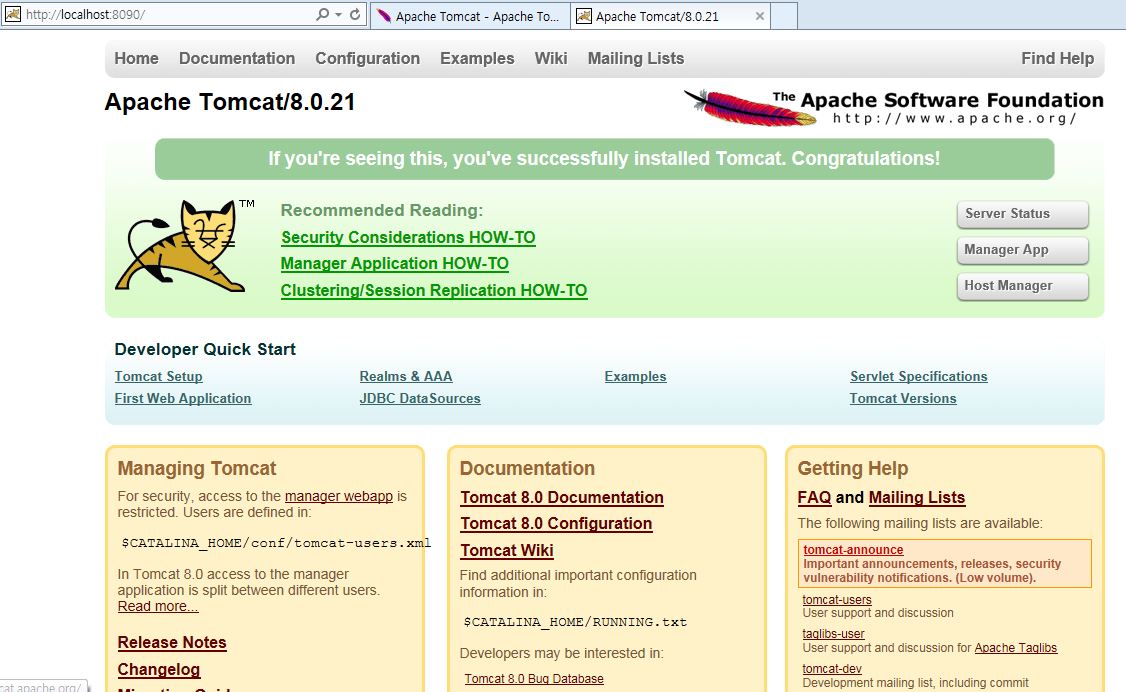
http://localhost:8090=>가동(성공시 홈페이지 나옴)
▶ JspStudy->프로젝트를 작성
이클립스 환경설정
Target runtime->서버등록->new runtime->Tomcat8.0선택과
create a new local server체크->sertver폴더생성
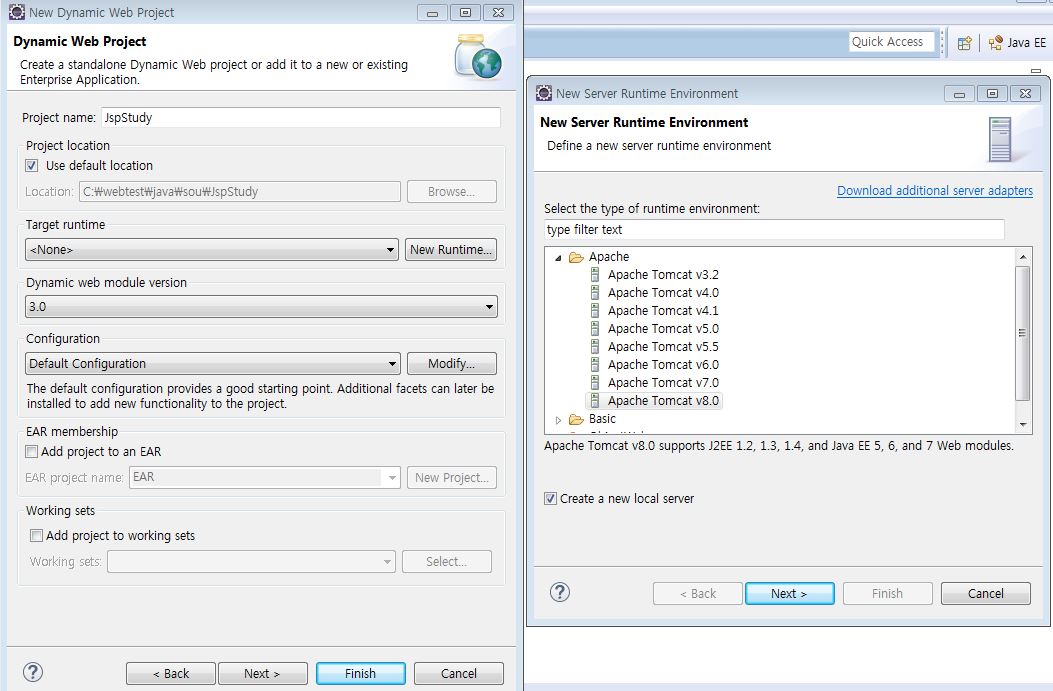
Eclipse->Tomcat8.0=>Java연결 사용
Tomcat Installation directory
c:\Tomcat8.0경로 지정
JRE : jdk1.8 or jre1.8


서블릿,DTO(자바)=>src에 저장(build\classes)
Context root =>JspStudy(프로젝트명)
Content directory=> WebContent(작업폴더 최상위폴더) html,css,js,jsp…
Generate web.xml deployment descriptor체크->web.xml파일을 하나 생성
※ 프로젝트설명
JspStudy
|
-Java Resources
|
-src=>자바파일은 여기에 저장
-WebContent(/)->html,css,js,jsp…(index.jsp or main.jsp)
|
-hello.jsp
|
-abc -> imsi.jsp
|
-META-INF->DB연동파일 설정
|
-WEB-INF
|
-lib->ojdbc6.jar(외부패키지 저장위치)
|
-web.xml->환경설정(모델2)
main.jsp=>모델1
main.do=>모델2
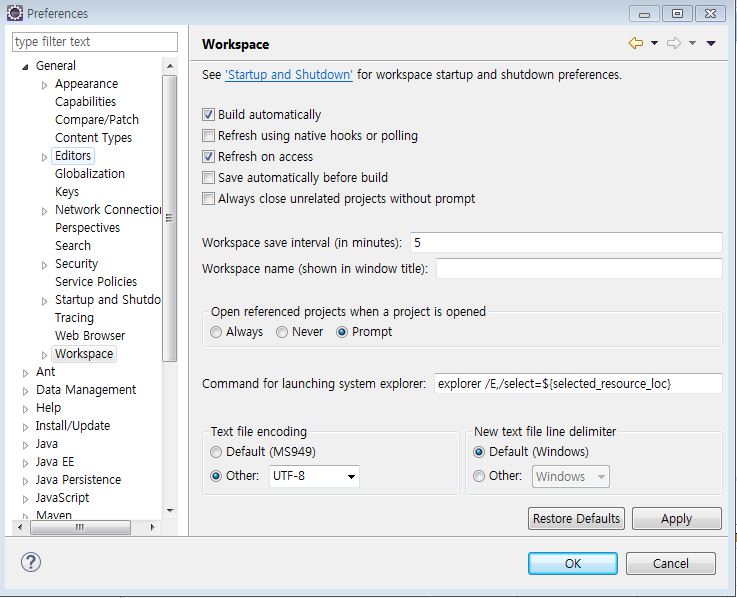
이클립스 환경설정
windows->Preferences
|
General
|
-Workspace(작업영역)
한글인코딩->euc-kr(x)=>UTF-8로 통합
Text file encoding->utf-8
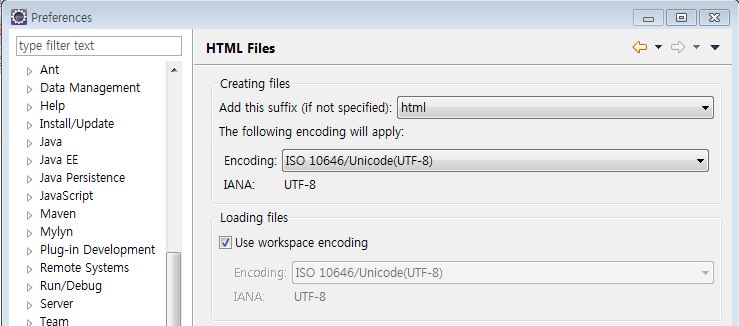
|
-Web
|
-CSS
|
-HTML
|
-JSP Files
====>utf-8


WebContent->hello.jsp만들기
New JSP File(html)->이거로 실행
New JSP File(xhtml)=>Ajax
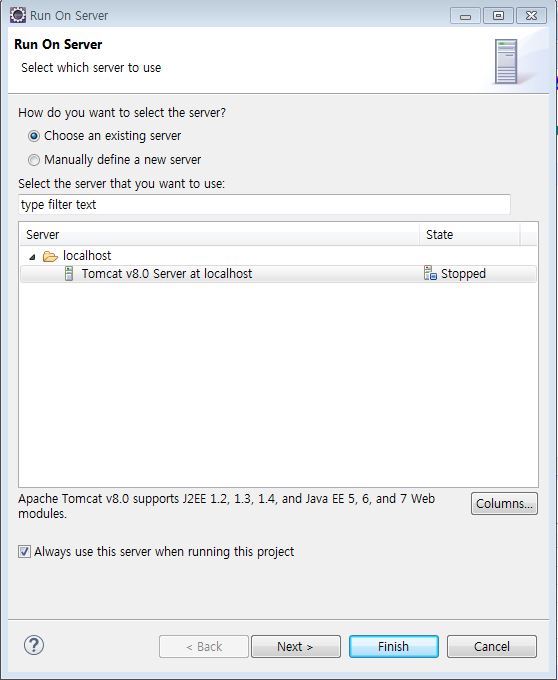
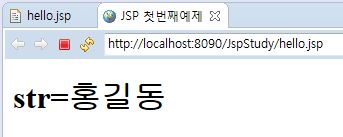
http://localhost:8090/JspStudy/hello.jsp
프로토콜명://도메인이름(ip):포트명/프로젝트명/~.jsp
Ex) hello.jsp
실행결과
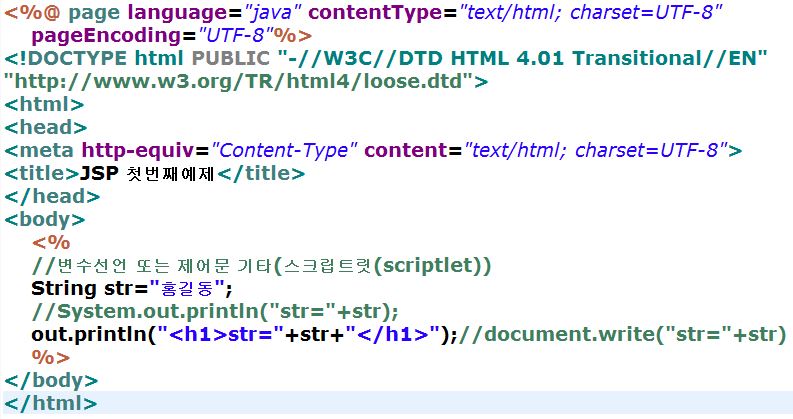
● JSP(Java Server Page)의 문법(스크립트 요소)->HTML+자바코드를 삽입->페이지(~.jsp)
1.스크립트릿 <% %>

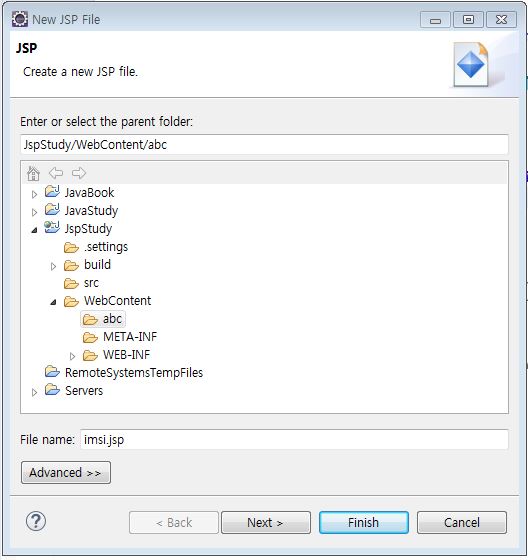
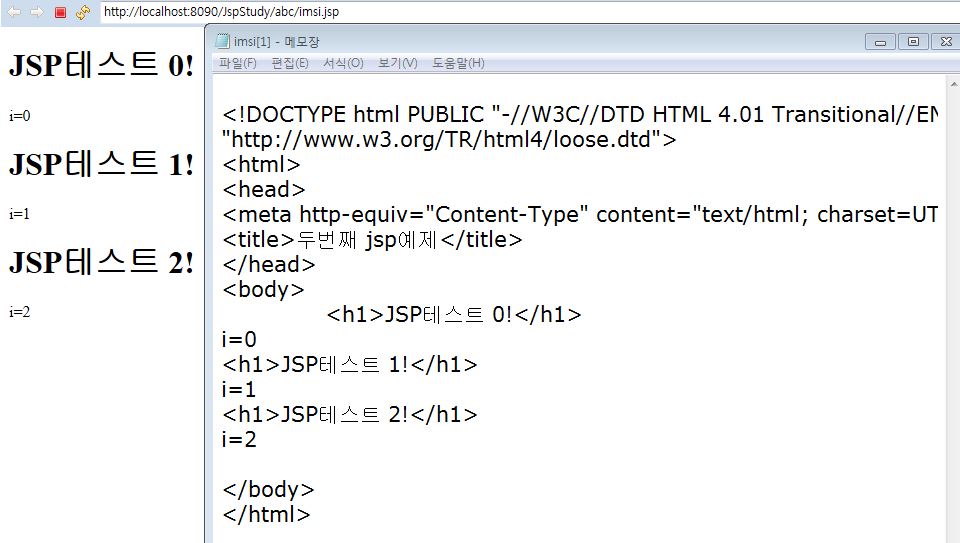
Ex) abc\imsi.jsp

실행결과

HTTP Status 500 – Unable to compile class for JSP: ->자바문법 오류
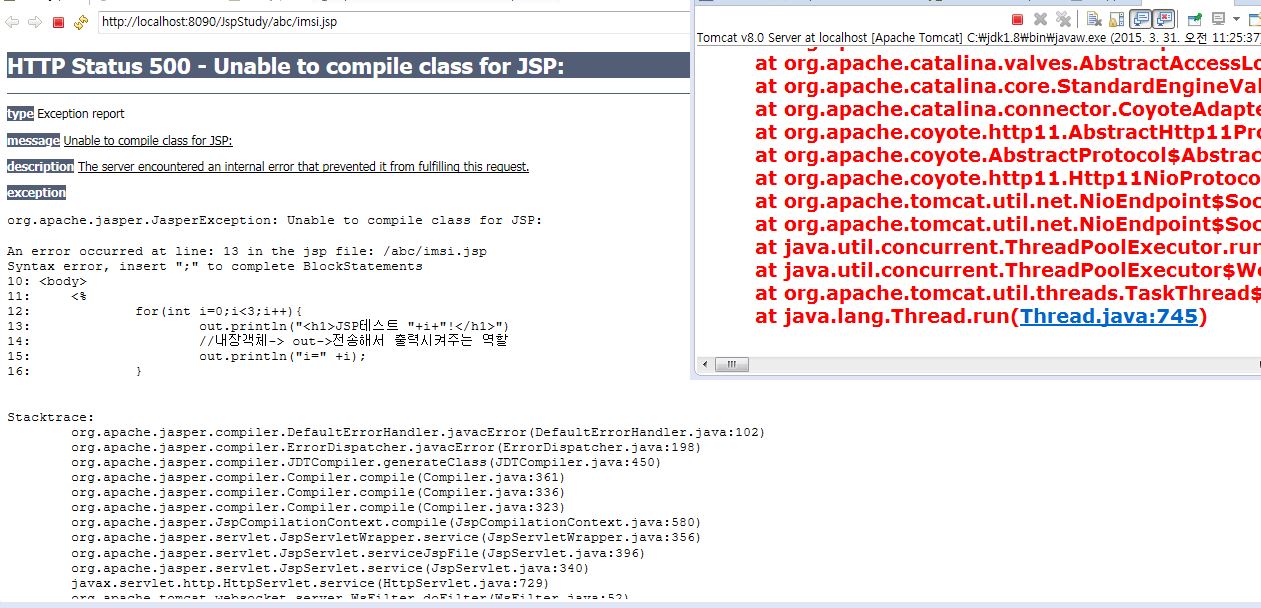
org.apache.jasper.JasperException: Unable to compile class for JSP:
An error occurred at line: 13 in the jsp file: /abc/imsi.jsp
Syntax error, insert “;” to complete BlockStatements
10: <body>
11: <%
12: for(int i=0;i<3;i++){
13: out.println(“<h1>JSP테스트 “+i+”!</h1>”)
14: //내장객체-> out->전송해서 출력시켜주는 역할
15: out.println(“i=” +i);
16: }
HTTP Status 404->경로가 틀렸거나 파일명이 잘못된경우
http://localhost:8090/JspStudy/hello.jsp
http://localhost:8090/JspStudy/abc/imsi.jsp(WebContent->abc->imsi.jsp)
Jsp->java->html파일로 보이게 됨
hello_jsp ->hello_jsp.java
자바코드+html,css,js==>JSP(자바코드만 써라)
2.표현식 ->변수값,디버깅용도
->스크립트릿 영역에 사용이 불가
형식) <%=출력할 변수명%>
<%=객체명.메서드명(~)%> ==>뒤에 ;을 붙이면 안됨
<%=정적메서드명(~)%>
주의할점) 1. 눈에보이는 주석내부에 표현식을 사용이 가능
2. 표현식내부에 자바주석이 가능하다.
3. 눈에 보이는 주석이라도 표현식에 문법적인 오류가 나면 에러가 발생
Ex)abc\imsi.jsp
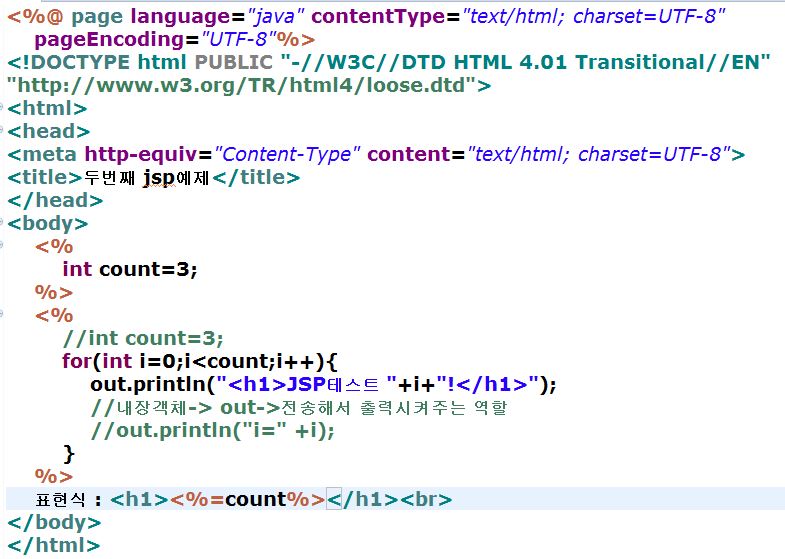
실행결과

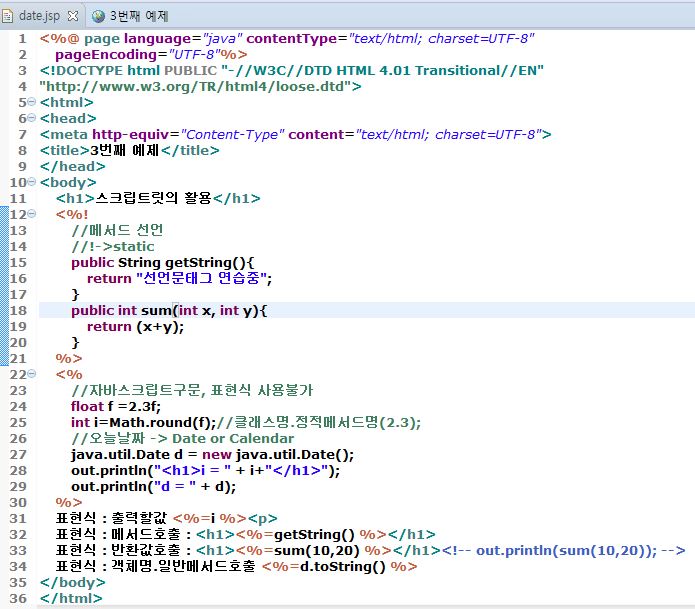
3.선언문->Declaration=>멤버변수에 작성
<%!
//정적변수선언(전범위), 정적메서드선언,static
%>
Ex) imsi.jsp

스크립트릿, 표현식->_jspservice()내부에서 자동적으로 작성된다.
모델1(jsp)->모델2(서블릿)->스프링
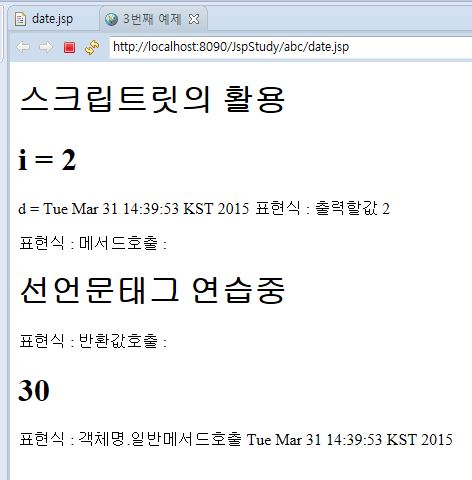
Ex) abc\date.jsp
실행결과
WebContent(/)
|
control ->array.jsp
Ex) array.jsp
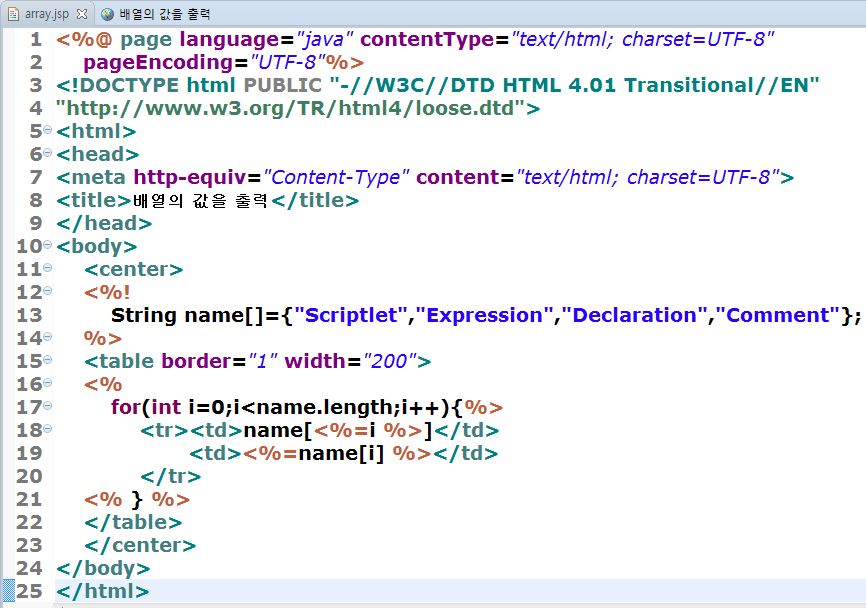
실행결과
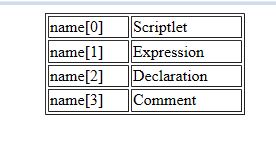
4. comment주석=>control\comment.jsp
Ex) comment.jsp
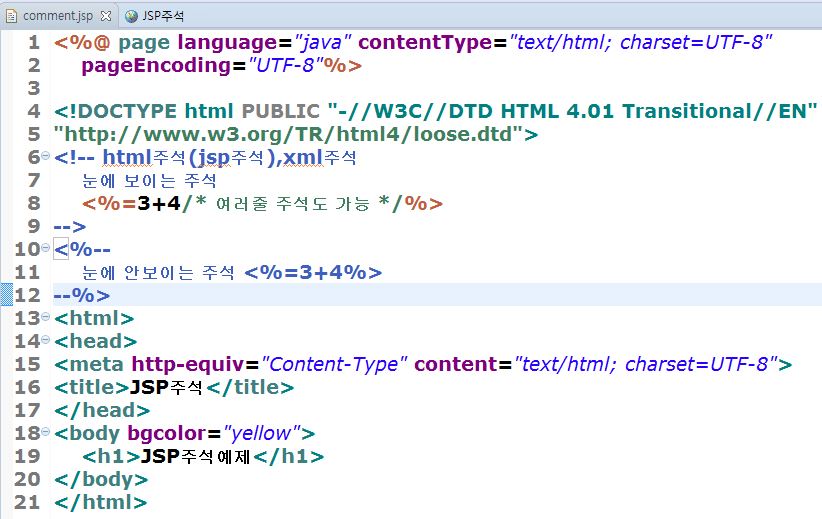
실행결과
실행오류
An error occurred at line: 8 in the jsp file: /control/comment.jsp
Syntax error, insert “;” to complete Statement
5: “http://www.w3.org/TR/html4/loose.dtd”>
6: <!– html주석(jsp주석),xml주석
7: 눈에 보이는 주석
8: <%3+4/* 여러줄 주석도 가능 */%>
9: –>
10: <%–
11: 눈에 안보이는 주석 <%=3+4%> –%>
요청을 받아서 처리하는 프로그램
요청을 받는쪽—–>전송—>처리??
jsp——–>jsp
html——>jsp
control
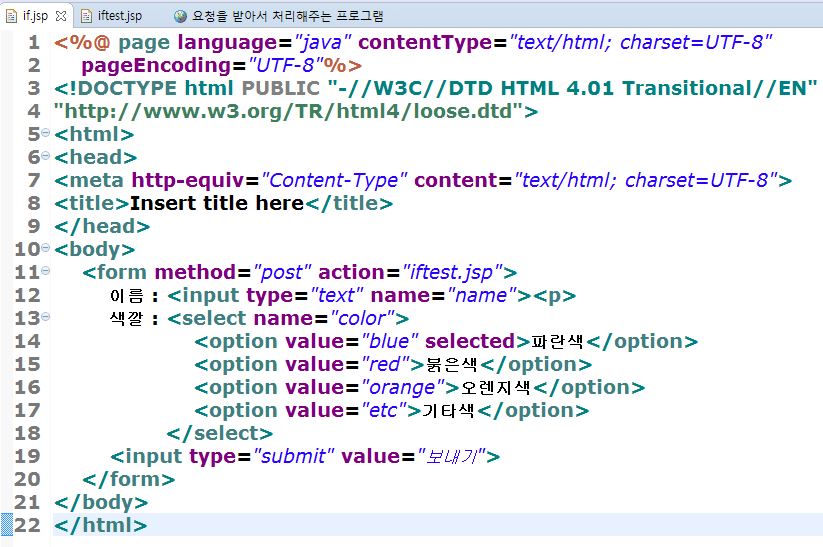
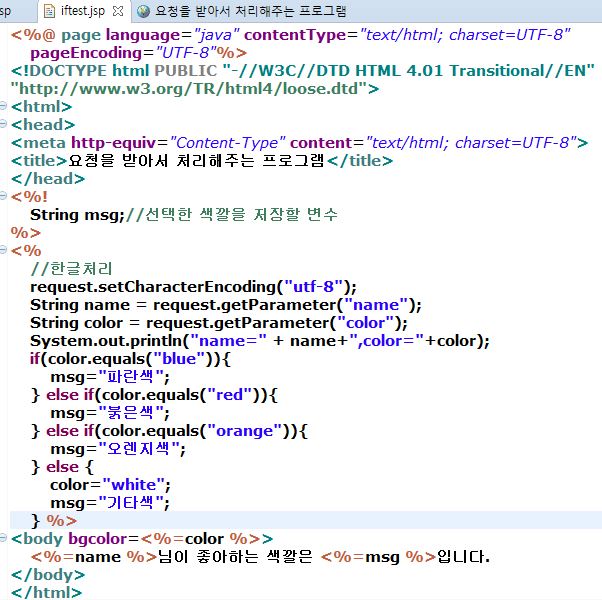
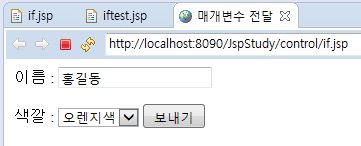
if.jsp—>iftest.jsp
Ex) if.jsp Ex) iftest.jsp
실행결과
 —–>
—–> (자체실행이 안됨)
※ i??e¸¸e??님이 좋아하는 색은 오렌지색입니다. —>한글설정을 해야함
—> request.setCharacterEncoding(“utf-8″);
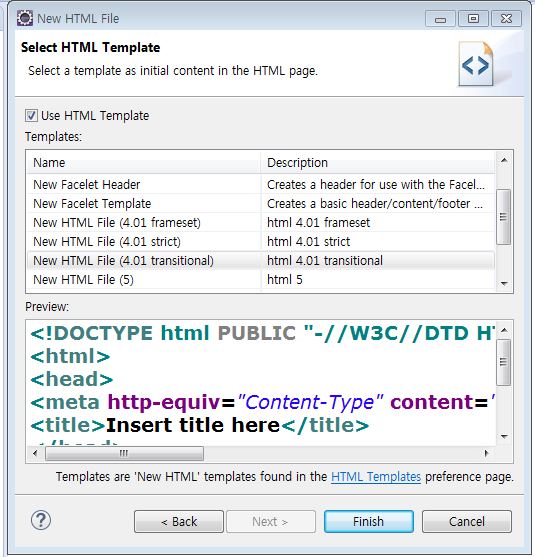
html -> new HTML File(4.01 transitional)
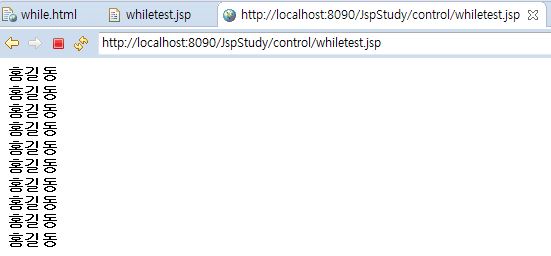
Ex) while.html(web page editor사용) Ex) whiletest.jsp


실행결과
 —–>
—–>

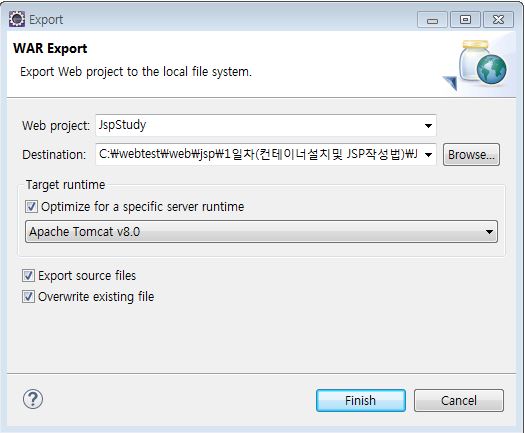
※ 예제를 집에 복사
프로젝트명을 마우스오른쪽버튼click->export->war(web archive)
경로->프로젝트명.war
->내보내기 Export->
Export source files(소스파일도 첨부) ->자바파일 작성
Overwrite existing file->추가된 자료를 첨부해서 넣을 수 있다.
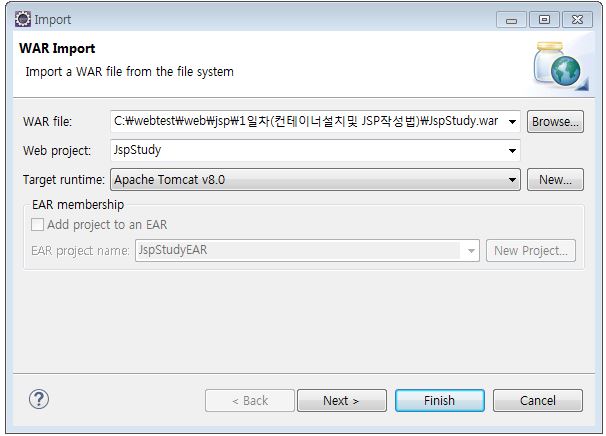
C:\webtest\web\sou==>앞으로의 예제
마우스오른쪽버튼 click->import–>war–>경로지정 불러오기
프로젝트명이 중복->프로젝트명 변경-> next->finish
과제)
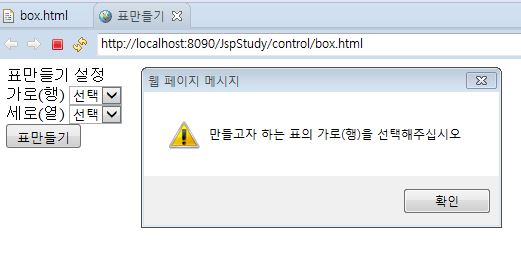
Ex) box.html Ex) box_proc.jsp

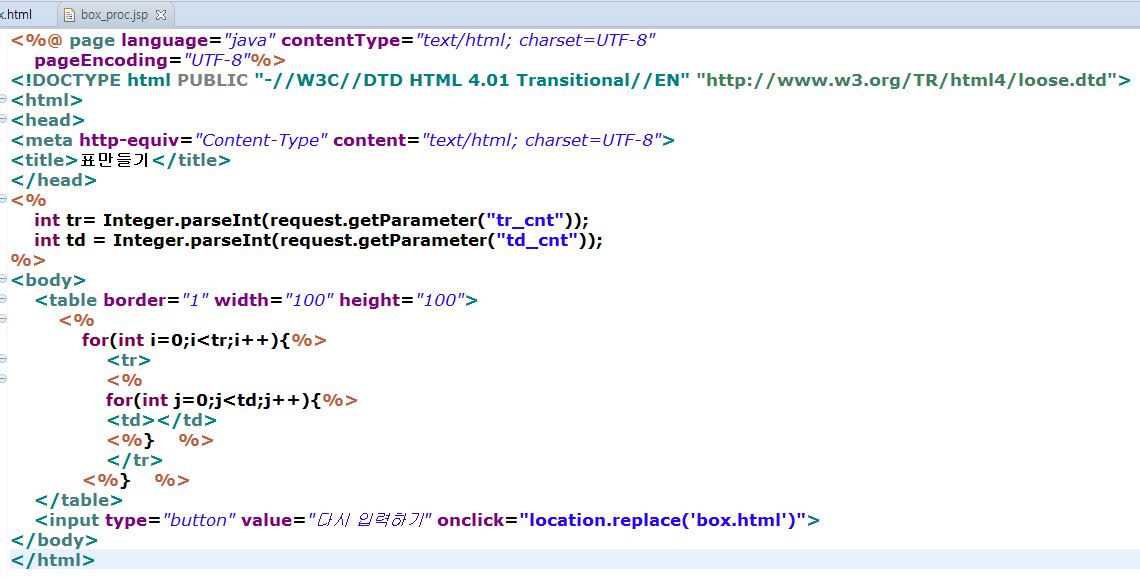
실행결과